Disclaimer: Under no circumstances do I guarantee that you will not brick your system by following the instructions below. You follow this guide at your own risk, I will not be held responsible for any damages resulting from your efforts to build a Hackintosh. Only YOU can prevent forest fires. I suggest taking a first pass through the documented instructions to get a feel for the process and also to get some file downloads started before you get to work on the X61.
My target machine's configuration:
- Model: Lenovo ThinkPad X61 laptop
- CPU: 2 GHz Intel Core 2 Duo SV T7300
- Memory: 4 GB PC-5300 RAM
- Disk: Seagate ST500LT012 5400 RPM SATA-II hard drive
- Graphics: Intel GMA X3100
- Sound: Intel High-Definition Audio (SoundMAX AD1981HD)
- Network: Intel 82566MM Gb Ethernet
- Network: Intel PRO/Wireless 3945ABG
- Expansion: ThinkPad X6 UltraBase
What you will need:
- Your X61, with or without UltraBase.
- USB keyboard and mouse for temporary use with the X61.
- Readily accessible PC. Doesn't really matter what operating system, as long as it can burn .ISO and .DMG files. For Windows, a great utility for this is TransMac.
- Blank CD and DVD media (one of each).
- USB drive for transferring files.
- A lot of patience.
Step 1: Update your BIOS (optional)
One annoying quirk with the stock X61 BIOS is that it only supports SATA I disk transfer speeds. The hardware, on the other hand, can support SATA II. If you have upgraded your internal hard drive like I have, you will benefit from updating to a third party BIOS. You can read all about the Middleton BIOS here.
- To get started, grab the archive here.
- Burn the included .ISO file to CD-ROM and boot your X61 from it. The BIOS update will take place immediately without any prompting. It won't look like it's doing anything for a while, so be patient until you see the notice of completion.
- Reboot your X61 and make sure it still works. If not, then you're probably done early with this project.
Step 2: Install Lion
You'll need to obtain a copy of the iATKOS L2 installation media. You can read all about iATKOS L2 here, but we're not going to follow all the instructions listed.
- Grab the .torrent file for the L2 archive here and put your favorite torrent client to work.
- Burn the included .DMG file to DVD-ROM and boot your X61 from it. The OS X installation procedure will start after a good amount of whirring by the DVD drive.
- Once you get to the Disk Selection page, go to the Utilities menu and run Disk Utility. This has been known to occasionally lock up the X61. If that happens, just start this step over and you're likely to succeed the next time.
- In Disk Utility, select the hard drive you want to install OS X onto.
- Click to the Partition section of the right pane.
- In the Partition Layout dropdown list, select 1 Partition. Multiple partition support is doable but is beyond the scope of this guide.
- Open the Options dialog and select GUID Partition Table for the partition scheme.
- Use Lion for the partition name. It can be changed later if you like.
- Select Mac OS Extended (Journaled) from the Format list.
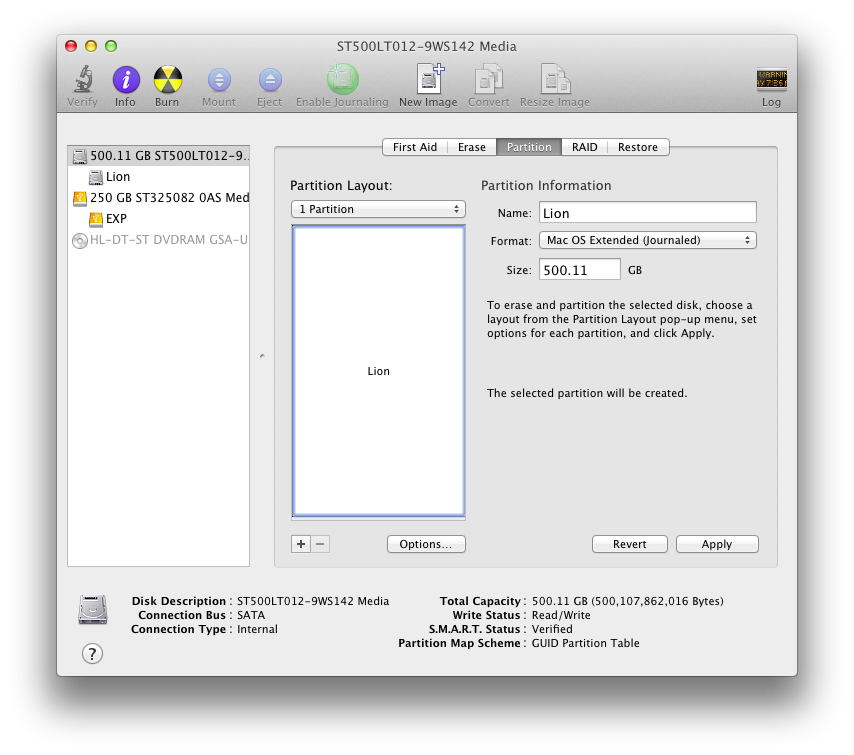 - Click Apply, make sure you're about to destroy the correct disk, then click Partition.
- Once partitioning is done, quit Disk Utility.
- In the installer's Disk Selection page, make sure to tag the Lion volume as your installation target.
- Open the Customize dialog. Most things should be left as default.
- The only change to make is to put a check on Drivers -> Main Hardware -> SATA/IDE -> AHCI SATA. Then click OK.
- Now you should be ready. Click Install!
- Kick back and relax. It will take a while.
- After installation is complete, your X61 will reboot. You will want to make sure it boots from the hard drive this time.
Did it boot into OS X? If so, continue on. If not, repeat this entire step until it does.
Step 3: Update some system files
On first boot, many system devices will be unavailable or not working properly. This is where that gets fixed.
- Grab a few extras from here.
- And a bunch of .kext files from here.
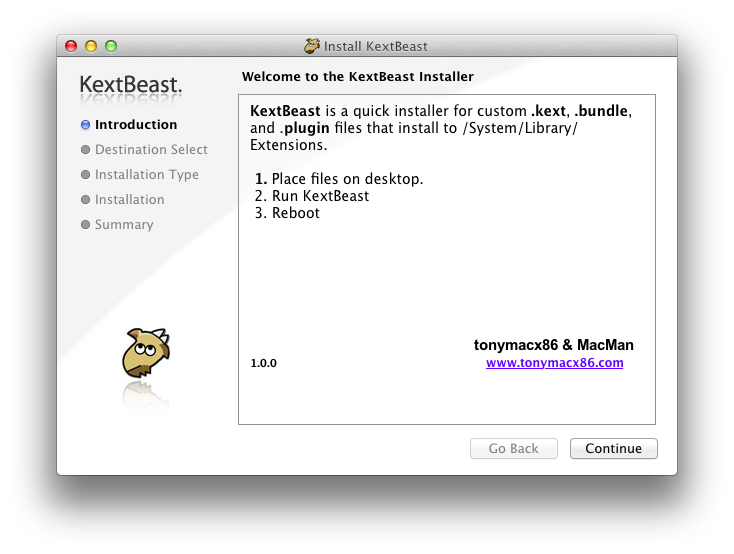
- And tonymacx86's KextBeast from here.
- Put all of these on a USB drive and plug it into the X61.
- On the X61, extract Extra.zip.
- Copy the two .plist files into /Extra, overwriting the existing files.
- Copy DSDT.aml into /.
- Extract current-SLE.zip.
- Copy all of the .kext files to your Desktop.
- Extract KextBeast.zip.
- Run KextBeast and follow the prompts through completion to install kernel extensions specific to the X61.
 - Restart the X61.
Still booting up OK? You should now be able to use most system devices and unplug the USB keyboard and mouse if you like. If you do unplug them, you'll want to disable the Bluetooth Assistant in your advanced Bluetooth preferences. Your machine is now a stable OS X 10.7.2 Hackintosh. You can pause here to set preferences as desired for networking and other aspects of the system.
Step 4: Update OS to 10.7.5
Do NOT use Software Updater to update your OS. Instead, you'll want to download the standalone OS X 10.7.5 Combo Update.
- Grab the update from here.
- And a fixer-upper script from here.
- And make sure you still have the .kext files and KextBeast from Step 3.
- Install the 10.7.5 Combo Update, but do NOT restart the machine yet.
- Prior to allowing the updater to restart your machine,
- Extract mac-os-x-lion-10.7.5-update-fixer.zip.
- Open up a Terminal session and change to the directory containing the fixer files.
- Use this command to run the fixer-upper:
- Run KextBeast again to put your X61-specific files extensions where they need to be.
- Now you can Restart you X61.
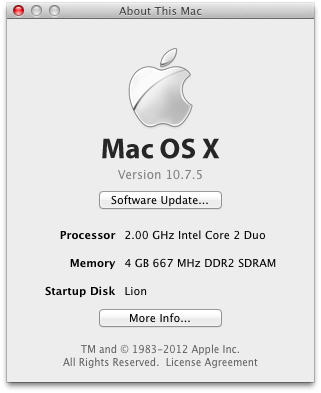
If it booted back up, you Hackintosh is now updated to OS X version 10.7.5! If not, I'm afraid you're back to Step 2.
Step 5: Prevent CMOS corruption
There's an issue in the stock AppleRTC extension that will cause corruption in you CMOS settings after allowing your computer to go to sleep. This is very annoying because it causes all your settings to be set back to default and also turns off your bluetooth device.
- To correct the issue, open a Terminal session on the X61 and use the following command to find and replace the offending bits:
You should now have a Hackintosh that is safe to put to sleep on occasion.
Step 6: Update the rest of the system software
You can now safely check for system updates using OS X's built-in updater. Everything should install fine and leave your X61 in a still-working state. If not, you know where Step 2 starts.
Step 7: Enjoy your Hackintosh!
You are now the proud owner of a Hackintosh X61. You'll be the envy of all your friends. Girls won't like you any more than they do now.
Hints:
- If your X61's bluetooth doesn't work or disappears after a future startup, reboot the X61 with a Linux LiveCD like Knoppix. Once the bluetooth device has been activated in the BIOS, it will be available to OS X again next time it's booted.
- You'll notice the wireless networking, PCMCIA card reader, and SD card reader still do not work. At this time, I don't have answers for supporting those devices. This post will be updated if and when I make further progress.
- You'll also notice your Hackintosh is running the OS in 32-bit mode. You can change it to 64-bit by editing org.Chameleon.boot.plist, but you will lose support for some of the built-in devices such as sound, keyboard, and trackpoint.
- I recommend turning off automatic system updates, just in case something comes along that could cause issues. Hopefully that isn't likely, but you may want to ability to control the update process and check on any suspicious-looking updates.
Useful tools:
- TransMac - A great app for managing Mac disk images on a Windows computer. I used it to burn my iATKOS install DVD.
- Carbon Copy Cloner - Very useful for duplicating disk content on your Hackintosh. After preparing a second hard drive's boot loader with iATKOS, I use CCC to keep an exact copy of my system drive in case I screw it up and need a quick restore.
- Vine VNC - Way better than Lion's built-in VNC server, and it's FREE!
- Xcode - I don't know much about developing apps for OS X, but I do know Xcode is an easy way to get GCC and related build tools installed on my Hackintosh.
- MacPorts - It can't get any easier to install many of the open source tools I'm used to using on other *nix-based platforms.
Final notes:
I hope this guide has helped someone. Please purchase your own copy of OS X Lion before attempting your build. I cannot vouch for the legalities of running OS X on alternative hardware, but I'm pretty sure Apple would like you to pay for any software you use. No Apple software is, or ever will be, provided by this site.
Thanks to the iATKOS, tonymacx86, and OSx86 teams for making this doable!
- Reboot your X61 and make sure it still works. If not, then you're probably done early with this project.
Step 2: Install Lion
You'll need to obtain a copy of the iATKOS L2 installation media. You can read all about iATKOS L2 here, but we're not going to follow all the instructions listed.
- Grab the .torrent file for the L2 archive here and put your favorite torrent client to work.
- Burn the included .DMG file to DVD-ROM and boot your X61 from it. The OS X installation procedure will start after a good amount of whirring by the DVD drive.
- Once you get to the Disk Selection page, go to the Utilities menu and run Disk Utility. This has been known to occasionally lock up the X61. If that happens, just start this step over and you're likely to succeed the next time.
- In Disk Utility, select the hard drive you want to install OS X onto.
- Click to the Partition section of the right pane.
- In the Partition Layout dropdown list, select 1 Partition. Multiple partition support is doable but is beyond the scope of this guide.
- Open the Options dialog and select GUID Partition Table for the partition scheme.
- Use Lion for the partition name. It can be changed later if you like.
- Select Mac OS Extended (Journaled) from the Format list.
- Once partitioning is done, quit Disk Utility.
- In the installer's Disk Selection page, make sure to tag the Lion volume as your installation target.
- Open the Customize dialog. Most things should be left as default.
- The only change to make is to put a check on Drivers -> Main Hardware -> SATA/IDE -> AHCI SATA. Then click OK.
- Now you should be ready. Click Install!
- Kick back and relax. It will take a while.
- After installation is complete, your X61 will reboot. You will want to make sure it boots from the hard drive this time.
Did it boot into OS X? If so, continue on. If not, repeat this entire step until it does.
Step 3: Update some system files
On first boot, many system devices will be unavailable or not working properly. This is where that gets fixed.
- Grab a few extras from here.
- And a bunch of .kext files from here.
- And tonymacx86's KextBeast from here.
- Put all of these on a USB drive and plug it into the X61.
- On the X61, extract Extra.zip.
- Copy the two .plist files into /Extra, overwriting the existing files.
- Copy DSDT.aml into /.
- Extract current-SLE.zip.
- Copy all of the .kext files to your Desktop.
- Extract KextBeast.zip.
- Run KextBeast and follow the prompts through completion to install kernel extensions specific to the X61.
Still booting up OK? You should now be able to use most system devices and unplug the USB keyboard and mouse if you like. If you do unplug them, you'll want to disable the Bluetooth Assistant in your advanced Bluetooth preferences. Your machine is now a stable OS X 10.7.2 Hackintosh. You can pause here to set preferences as desired for networking and other aspects of the system.
Step 4: Update OS to 10.7.5
Do NOT use Software Updater to update your OS. Instead, you'll want to download the standalone OS X 10.7.5 Combo Update.
- Grab the update from here.
- And a fixer-upper script from here.
- And make sure you still have the .kext files and KextBeast from Step 3.
- Install the 10.7.5 Combo Update, but do NOT restart the machine yet.
- Prior to allowing the updater to restart your machine,
- Extract mac-os-x-lion-10.7.5-update-fixer.zip.
- Open up a Terminal session and change to the directory containing the fixer files.
- Use this command to run the fixer-upper:
sudo ./UpdateFixer.sh- Run KextBeast again to put your X61-specific files extensions where they need to be.
- Now you can Restart you X61.
If it booted back up, you Hackintosh is now updated to OS X version 10.7.5! If not, I'm afraid you're back to Step 2.
Step 5: Prevent CMOS corruption
There's an issue in the stock AppleRTC extension that will cause corruption in you CMOS settings after allowing your computer to go to sleep. This is very annoying because it causes all your settings to be set back to default and also turns off your bluetooth device.
- To correct the issue, open a Terminal session on the X61 and use the following command to find and replace the offending bits:
sudo perl -pi -e 's|\x75\x30\x44\x89\xf8|\xeb\x30\x44\x89\xf8|; s|\x75\x3d\x8b\x75\x08|\xeb\x3d\x8b\x75\x08|' /System/Library/Extensions/AppleRTC.kext/Contents/MacOS/AppleRTCYou should now have a Hackintosh that is safe to put to sleep on occasion.
Step 6: Update the rest of the system software
You can now safely check for system updates using OS X's built-in updater. Everything should install fine and leave your X61 in a still-working state. If not, you know where Step 2 starts.
Step 7: Enjoy your Hackintosh!
You are now the proud owner of a Hackintosh X61. You'll be the envy of all your friends. Girls won't like you any more than they do now.
Hints:
- If your X61's bluetooth doesn't work or disappears after a future startup, reboot the X61 with a Linux LiveCD like Knoppix. Once the bluetooth device has been activated in the BIOS, it will be available to OS X again next time it's booted.
- You'll notice the wireless networking, PCMCIA card reader, and SD card reader still do not work. At this time, I don't have answers for supporting those devices. This post will be updated if and when I make further progress.
- You'll also notice your Hackintosh is running the OS in 32-bit mode. You can change it to 64-bit by editing org.Chameleon.boot.plist, but you will lose support for some of the built-in devices such as sound, keyboard, and trackpoint.
- I recommend turning off automatic system updates, just in case something comes along that could cause issues. Hopefully that isn't likely, but you may want to ability to control the update process and check on any suspicious-looking updates.
Useful tools:
- TransMac - A great app for managing Mac disk images on a Windows computer. I used it to burn my iATKOS install DVD.
- Carbon Copy Cloner - Very useful for duplicating disk content on your Hackintosh. After preparing a second hard drive's boot loader with iATKOS, I use CCC to keep an exact copy of my system drive in case I screw it up and need a quick restore.
- Vine VNC - Way better than Lion's built-in VNC server, and it's FREE!
- Xcode - I don't know much about developing apps for OS X, but I do know Xcode is an easy way to get GCC and related build tools installed on my Hackintosh.
- MacPorts - It can't get any easier to install many of the open source tools I'm used to using on other *nix-based platforms.
Final notes:
I hope this guide has helped someone. Please purchase your own copy of OS X Lion before attempting your build. I cannot vouch for the legalities of running OS X on alternative hardware, but I'm pretty sure Apple would like you to pay for any software you use. No Apple software is, or ever will be, provided by this site.
Thanks to the iATKOS, tonymacx86, and OSx86 teams for making this doable!
Thank you man! My X61 become small Lion :)
ReplyDeleteOnly step 5. don't work for me..
how to install this hackintosh in a pen drive
ReplyDeleteGreat guid, easy to follow, many thanks to Slor, everything went perfectly, all I need to do now is find a fix for the Wifi, anyway I can highly reccemend this guid for the X61
ReplyDeleteKind Regards
Phill
Great - thanks for the feedback!
Deleteafter step 3 i have kernel panic...what can ia do?
DeleteI'm afraid I don't know. That's not something I ran into with this combination of tools.
DeleteThat was fantastic - I have an old G4 PowerBook, and I always wondered what OS X was like on an Intel machine. Your instructions worked perfectly on my X61 although there was a grey screen for several minutes after step three. For some reason it doesn't recognise the X61's Bluetooth, and I had to use the manufacturer's driver to get my USB dongle working (it's one of those tiny Edimax Nano things).
ReplyDeleteIt feels a bit stuttery but perhaps OS X is doing some housekeeping in the background. After fiddling around with an external DVD I realised that I had the X6 UltraBase sitting around with a DVD drive, which works. I haven't tested the battery life yet. After doing all the above the software update detects about 400mb of updates, mostly Java and iTunes.
So, virtual drinks to you and the people behind iATKOS and Mr Tonymacx86 and yourself. And David Attenborough, who didn't help at all but he probably would have, because he's a nice man.
Outstanding - glad it worked for you!
DeleteHi,
ReplyDeleteI managed, after some hard work, to install OsX in my X61s, Thank you for the guide!
After install, all worked, including SD reader and all 3 USB ports, but, as adviced in your guide, WLAN and sound didn't work still.
I could enable my Atheros card with this kext:
http://www.hackintoshosx.com/files/download/2836-atheros-fix-kext/
For the sound, I used the VodooHDA Kext contained in this bundle:
http://www.hackintoshosx.com/files/file/3720-lenovo-thinkpad-t61-7665-dn3-perfect-hackbook-bundle/
BTW, I used the Kext utility in this bundle instead of kextbeast, it seems to work better.
With these two kexts I got a fully functional MacOS, with WLAN and sound. The only problem now is that brightness is always at 100%. Perhaps it is only a key mapping problem, I'm going to try some script with it. The only thing I haven't tried yet is the FW port.
Outstanding! Thanks for the tips.
DeleteWhich version of OSX did you install? 10.7.5? Is this the last version that will run on the X61s? Or which is the last?
DeleteYes, 10.7.5. At the time, it was the most current version that could be expected to work. I really couldn't tell you what may have changed in the last couple years.
DeleteI fear the x61s incompatible later versions of OSX since the X3100 graphics has noch 64-bit drivers.
DeleteCan you still retain the Windows OS with the new OSX? If so, how do you handle the dual boot? Thank you.
ReplyDeleteHi..
ReplyDeleteThe first section of the guide worked for me (10.7.2)
I have tried several times to upgrade to 10.7.5 through the combo update
but have failed repeatedly... black screen...
BTW I followed your instructions to the T
Regards
This comment has been removed by a blog administrator.
ReplyDeleteThis comment has been removed by a blog administrator.
ReplyDelete